Backgrounds and lighting
Backgrounds and lighting
Part 6
Now we should have a basic textured scene and we are going to add to that by adding a reflection map to the door handles and a skybox outside
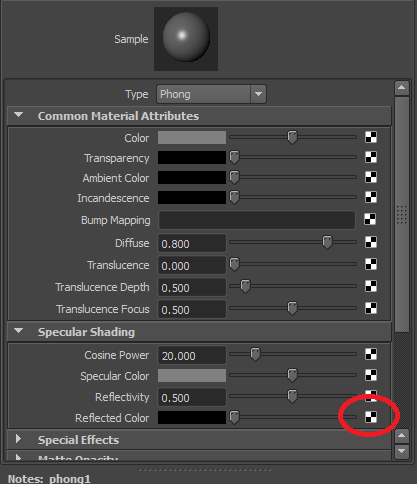
Select the doorhandles texture in the hypershade
Click on the black and white checkered box next to reflected color
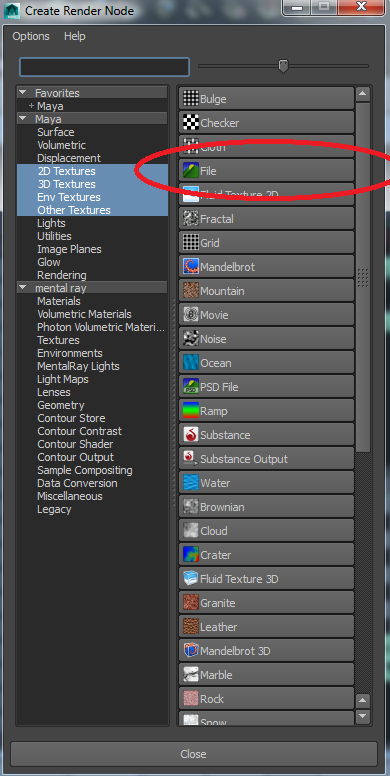
then file
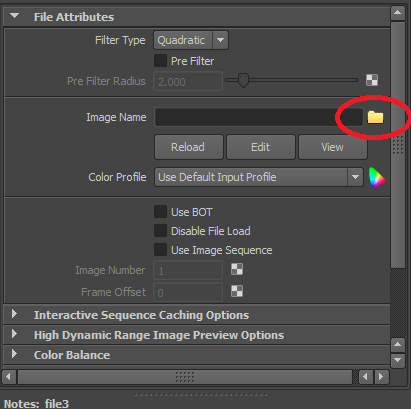
A new box should open then select the folder button
pack_tutorial\sources\scenes\textures\spheremaps
eucalyptus_grove
Click that then open
Note that textures can only be to the power of 2 and 4 256 512 1024 2048
Otherwise they will not be converted into dds and will not work
Sometimes a texture will not convert anyway and you will need to convert it manually and put it in the correct folder i have only had this happen once
This is how we add textures to any object in the game feel free to add textures to everything in the scene but im not going to bother for this tutorial
Next thing to do is open the start.ini in the file maker
And uncomment
//compress = true;so its
compress = true;
This will compress the textures into the correct folder but it will do this every time if the line is uncommented so remember to only do it when you have added a new texture
Run the filemaker then have a look at the texture ingame
Now all the materials its applied to will look like metal and have a nice shine to them
Except the door handles they look like disco balls
there is a way to fix this but it does add more polys to the door handles
Select the door hold right click and go to face
Select the door handle
Hold ctrl then hold right click and go to shell
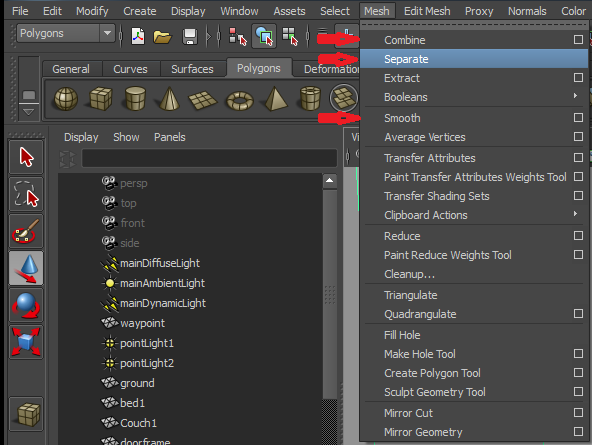
Go up to mesh then separate
Select the door handle
Go to mesh then smooth
Then select the door handle and door then go mesh combine
This will reattach the doorhandles to the door but will mess up the pivot point which we will have to fix
If we did not detach it then the whole door would have been smoothed and would look wrong
Save then run the filemaker to see it ingame
Next we are going to add our skybox
But first we need to know how big to make it
Import the roads and buildings from the Background folder I did not make these objects they are assests from Autodesk 3ds Max Learning Channel so credit goes to them
Rename them bad : and apply the lambet1 texture to them all or add your own textures, Again im not going to for this tutorial
Next make a sphere that covers the roads and name it skybox
Then make a new Lambert texture called skybox
Click the checker box next to colour and choose file then the folder button and find the skybox texture
Apply the skybox texture to the sphere and tick textured to see it
If you can see the black line then move the sphere down a bit
Next open up the skybox texture and the ambient color is how bright the texture is so for this one around 10% or dark gray works well also put diffuse to 0
Save the scene and run the file maker with the compress uncommented to convert the files to dds
Notice how much longer that took imagine it with 30 more textures that’s why comment out the compress line when not using it
My skybox did not work its just black?
That s because the faces of the sphere are facing outwards
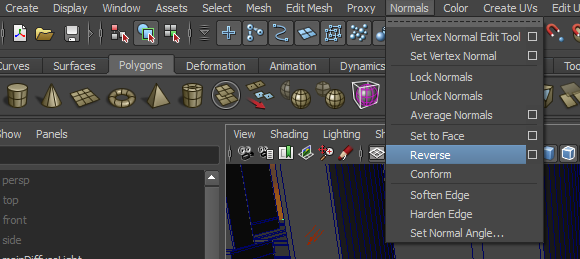
select the skybox go to normals > reverse
Save the scene re-run the filemaker and check it out now
Much better but what happens when we use fluids in the map since the lowest object is where fluids get deleted they have to make it all the way to the roads below test it out now
I managed to get to 4 fps
So we need to fix this but first fill out the city using the 3 buildings and duplicate them around (center their pivot first) not like 200 buildings tho just add enough to fill it out a bit
Save and check it out
When you are happy with it attach all the buildings together
like we did with the doorhandle
mesh > Combine
Now next to the scene.ma is a scene.ini open that
This controls all the models in the game that come from the scene.ma
Down the bottom add in (rename your objects to match or change the code) rdi uses the first name and rd uses the 2nd
rdI "Buildingsall"
{
  light_group = 0;

  outside = true;
  visible = true;

  ambient_light {name = "mainAmbientLight";}

  ss_override = true;
  light[0] {name = "mainDiffuseLight";}

}
rdI "roads1"
{
  light_group = 0;

  outside = true;
  visible = true;

  ambient_light {name = "mainAmbientLight";}

  ss_override = true;
  light[0] {name = "mainDiffuseLight";}

}
rd "SkyboxShape"
{
  elem[0]
  {
    outside = true;
  }
}
outside = true; means that the object is in the background and fluids wont be effected by it
Save the file and scene and run the filemaker and check to make sure fluids get deleted where they should
a nice smooth 60fps for me
Notice why i joined all the building up into one object otherwise you would have to add each building to the scene.ini
Next thing we will cover is shadows
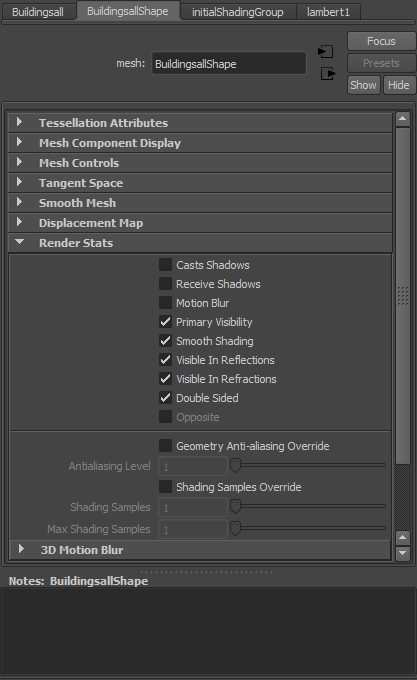
In Maya select the buildings and in the 2nd name tab find the down arrow next to render stats
Casts shadows when unticked will add shadows ingame
Recieve shadows when unticked will recieve shadows ingame
Motion blur when unticked will enable ambient occlusion when ingame
Do this for each object in the map that you think would need this
One sided textures only cast shadows if their main side is facing the light back side wont cast shadows like the ceiling
Save the scene and test it out
I will note however that the lighting is a bit hard to get right in version 3 and im hoping it will be better in version 4
Like if you look away from an object it will unload it from the world and will take its shadow with it
Also you can only have one shadow casting light at one time and it must be a directional light
We can cheat and bake shadows into the texture maps to fake shadows if you can be bothered
But while we are on lighting and have the scene.ini open lets go over the lights in there
lightI "mainAmbientLight"//----This light casts light evenly across the map with no shadows
{
  intensity = 0.5;//---- How bright the light is
  color     = (255,255,255,255);//---- Colour of the light

  default = true;//---- Not too sure but i think it means use it?
}


lightI "mainDiffuseLight"//---- This light is the main shadow caster in the map and will light and shadow the map from one direction
{
  intensity  = 0.6;//---- How bright the light is
  intensity2 = 0.6;//--- How wide the light is?
  color      = (255,255,250,255);//---- Colour of the light

  default = true;//---- Not too sure but i think it means use it?


  cast_shadow = true;//---- If the light will cast shadows and only works on directional lights

  shadow_dyn  = true;//---- If the light will cast moving shadows like the player and objects?

  shadow_buffer_width  = 4096;//--- Shadow map detail,default 2048
  shadow_buffer_height = 4096;//--- Shadow map detail,default 2048


  group = 0;//---- Which group the light belongs to
this can also be added to objects
}


lightI "mainDynamicLight"//---- A different named directional light
{
  usage   = NEVER;//---- This light wont be used

  intensity  = 0.5;
  intensity2 = 0.5;
  color      = (255,255,250,255);

  dynamic = true;//---- I don’t know
}

lightI "pointLight1"//---- A point light does not cast shadows
{
  intensity  = 0.7;//----How bright the light is
  intensity2 = 1;//---- How wide the light is?
  color      = (255,255,250,255);//---- Colour of the light

  group = 0;//---- Which group the light belongs to
this can also be added to objects
}
Feel free to move the lights around the scene and align the main diffuse light up with the sun on the background
In the next part we will learn how to do collisions and doors
Part 7's breathing just got a bit faster
