Difference between revisions of "Changing textures"
From XStoryPlayer Wiki
| Line 33: | Line 33: | ||
[[file:alien_tex1.jpg|400px]]</li> | [[file:alien_tex1.jpg|400px]]</li> | ||
</ol> | </ol> | ||
| + | |||
===Adding talking sound=== | ===Adding talking sound=== | ||
Revision as of 13:33, 7 January 2015
The scene textures can be found in the ./pack/pack_dungeon/scenes/textures directory.
The scene sounds can be found in the ./pack/pack_dungeon/scenes/sounds directory.
The character sounds can be found in the ./pack/pack_dungeon/ai/speech/default directory.
Texture format
- XStoryPlayer color textures are in .dds file format.
- XStoryPlayer bump/displacement/normal textures are not in the .dds file format because that results in artifacts due to its normalized nature.
A .dds file is an compressed image format like .png or .jpg.
It contains reduced (mipmapped) versions of the image and it can directly be used as a compressed texture by the graphics card.
Editing Saiko texture files
- Most image editors have a plugin that allows you to open .dds files. This tutorial assumes you will be using Photoshop.
Download a .dds plugin for photoshop here. - Open the
/scenes/textures/character6/body_all_png.ddstexture.
It is the body skin texture used for Saiko her body. Use "Load Using Default Sizes" in the .dds popup dialog if you get this popup dialog. - You can change the skin texture using Photoshop. This texture also has an alpha channel that contains the reflection parameter for the skin.
As you can see the lips area e.g. is more reflective. - After editing the texture save it in the the .dds format. Make sure you also save the alpha channel. Save it in the DXT5 format and generate MIP maps.
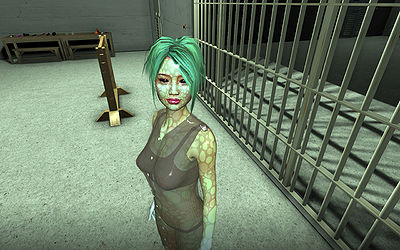
We use the DXT5 format for 4 channel textures and DXT3 for 3 channel textures. - To make Saiko somewhat more alien like replace the
/alien_textextures (from the 'Tutorial Resource Pack') with the current Saiko body textures.
Both the skin color and eye color texture are changed. Also the bump texture is changed. - To quickly see the result when editing a texture press F4 and reload the scene.
Because you don't have saved files you will see the fastsex Saiko dialog. After pressing Apply it will reload making the changes visible.
You can also do this to quickly reload after editing script code. - After the textures are replaces Saiko should look like this:

Adding talking sound
- At the moment the girls only make sounds during sex and in other special situations. It is however possible to add sound files to sentences.
To let a character make a sound the following code can be used:talk.s = "aaaahhhhhhh"; // The mouth movement is derived from this text talk.file = "scream1"; // The file in the ai/speech directory talk.volume = 1.050; // The sound volume talk.text = false; // Do not show text in dialog window
First the
ai/speech/saiko/location is tried. If the file is not there theai/speech/default/location is used.
This allows you to add girl specific sounds.