Difference between revisions of "Creating animations"
From XStoryPlayer Wiki
| Line 150: | Line 150: | ||
This will create the character object with the pose added.<br> | This will create the character object with the pose added.<br> | ||
Copy the <code>character6/characterShape.obj</code> to the dungeon pack.</li> | Copy the <code>character6/characterShape.obj</code> to the dungeon pack.</li> | ||
| − | <li>Now add the | + | <li>Now we need to describe how the animation is used. Open the dungeon <code>init/std/base/char/char_base.dat</code> file and add the following at the end: |
| + | <syntaxhighlight lang="cpp"> | ||
| + | pose_type[126] | ||
| + | { | ||
| + | type = BENDOVER; // The pose name | ||
| + | id = 0; // The pose id | ||
| + | name = "*bendover_0"; // The pose animation | ||
| + | |||
| + | need_type = STAND; // Need this pose before starting | ||
| + | need_id = 0; | ||
| + | |||
| + | go_type = STAND; // Goto this pose when ready | ||
| + | go_id = 0; | ||
| + | |||
| + | fade_in = 1.5; // Fade in | ||
| + | |||
| + | damp = 3; // Damping | ||
| + | |||
| + | loop = false; // No loop | ||
| + | } | ||
| + | </syntaxhighlight> | ||
| + | Save the <code>init/std/base/char/char_base.dat</code> file. | ||
| + | </li> | ||
</ol> | </ol> | ||
Revision as of 11:32, 25 July 2015
In this tutorial you will learn how to add an animation to a character.
Steps
- Make sure you have downloaded and installed the Character Packs. We are using them in this tutorial.
Also make sure you have the dungeon scene unpacked. We will use that scene as a test scene. - Open the
character6/body.mafile in Maya. You see the poses are stored in keyframes.
Also check outcharacter6/body.inifile. It contains a lot of movies. We will be adding a movie pose that lets the character bend over. - Now we will create a new pose. Use the following Mel script to select all joints (Best is to create a button for it by dragging the script to the toolbar):
select -r character ;
select -add hip_left ;
select -add hip_lrot ;
select -add knee_left ;
select -add foot_left ;
select -add hip_right ;
select -add hip_rrot ;
select -add knee_right ;
select -add foot_right ;
select -add spine_bottom ;
select -add spine_mid ;
select -add spine_top ;
select -add neck_joint ;
select -add head_joint ;
select -add shoulder_left ;
select -add arm_left ;
select -add arm_lrot ;
select -add elbow_left ;
select -add hand_left ;
select -add shoulder_right ;
select -add arm_right ;
select -add arm_rrot ;
select -add elbow_right ;
select -add hand_right ;
Select frame 300 and to Right Mouse Click - Copy.
Now we created a new pose frame and we can adjust the new pose.
Select free frame 11500 and do Right Mouse Click - Paste (Paste).
-
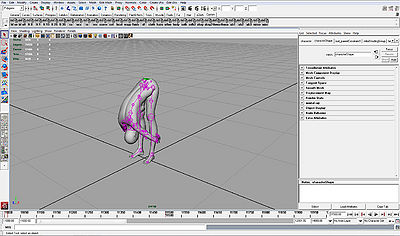
Create a bending pose by rotating the joints. To something like this:
When you are finished run this Mel script (Best is to create a button for it by dragging the script to the toolbar):select -r hip_left ; setKeyframe "hip_left.rotateY"; setKeyframe "hip_left.rotateZ"; select -r knee_left ; setKeyframe "knee_left.rotateY"; select -r foot_left ; setKeyframe "foot_left.rotateY"; setKeyframe "foot_left.rotateZ"; select -r hip_right ; setKeyframe "hip_right.rotateY"; setKeyframe "hip_right.rotateZ"; select -r knee_right ; setKeyframe "knee_right.rotateY"; select -r foot_right ; setKeyframe "foot_right.rotateY"; setKeyframe "foot_right.rotateZ"; select -r spine_bottom ; setKeyframe "spine_bottom.rotateY"; setKeyframe "spine_bottom.rotateZ"; select -r spine_mid ; setKeyframe "spine_mid.rotateY"; setKeyframe "spine_mid.rotateZ"; select -r spine_top ; setKeyframe "spine_top.rotateY"; select -r neck_joint ; setKeyframe "neck_joint.rotateY"; setKeyframe "neck_joint.rotateZ"; select -r head_joint ; setKeyframe "head_joint.rotateX"; setKeyframe "head_joint.rotateY"; select -r shoulder_left ; setKeyframe "shoulder_left.rotateX"; setKeyframe "shoulder_left.rotateZ"; select -r arm_left ; setKeyframe "arm_left.rotateY"; setKeyframe "arm_left.rotateZ"; select -r elbow_left ; setKeyframe "elbow_left.rotateY"; select -r hand_left ; setKeyframe "hand_left.rotateX"; setKeyframe "hand_left.rotateZ"; select -r shoulder_right ; setKeyframe "shoulder_right.rotateX"; setKeyframe "shoulder_right.rotateZ"; select -r arm_right ; setKeyframe "arm_right.rotateY"; setKeyframe "arm_right.rotateZ"; select -r elbow_right ; setKeyframe "elbow_right.rotateY"; select -r hand_right ; setKeyframe "hand_right.rotateX"; setKeyframe "hand_right.rotateZ"; select -r arm_rrot; setKeyframe "arm_rrot.rotateX"; select -r arm_lrot; setKeyframe "arm_lrot.rotateX"; select -r hip_rrot; setKeyframe "hip_rrot.rotateX"; select -r hip_lrot; setKeyframe "hip_lrot.rotateX"; select -r character ; setKeyframe "character.translateX"; setKeyframe "character.rotateX"; setKeyframe "character.rotateY"; setKeyframe "character.translateY"; setKeyframe "character.rotateZ"; setKeyframe "character.translateZ";
This will set the new keyframe and fix the pose.
Save thecharacter6/body.mafile. - Open the
character6/body.inifile. Add this code after thejiggle_0movie to create the movie pose:movie "bendover_0" { frame[11500] = 0; }
This will add the frame to the character. Save the
character6/body.inifile. - Run the filemaker character6 creation script (see Character Packs).
This will create the character object with the pose added.
Copy thecharacter6/characterShape.objto the dungeon pack. - Now we need to describe how the animation is used. Open the dungeon
init/std/base/char/char_base.datfile and add the following at the end:pose_type[126] { type = BENDOVER; // The pose name id = 0; // The pose id name = "*bendover_0"; // The pose animation need_type = STAND; // Need this pose before starting need_id = 0; go_type = STAND; // Goto this pose when ready go_id = 0; fade_in = 1.5; // Fade in damp = 3; // Damping loop = false; // No loop }
Save the
init/std/base/char/char_base.datfile.
