Difference between revisions of "Creating cloth"
| Line 79: | Line 79: | ||
Now we want to test the new dress in our story. Because we want to start XStoryPlayer in story mode, we have to change the '[[settings.ini]]' again.<br> | Now we want to test the new dress in our story. Because we want to start XStoryPlayer in story mode, we have to change the '[[settings.ini]]' again.<br> | ||
In order to not have to do this every time, create a shortcut in the [[XStoryPlayer]] directory for <code>XStoryPlayer64.exe</code>. Name this shortcut <code>XStoryTest</code><br> | In order to not have to do this every time, create a shortcut in the [[XStoryPlayer]] directory for <code>XStoryPlayer64.exe</code>. Name this shortcut <code>XStoryTest</code><br> | ||
| − | Set the shortcut target to: <code>"C:\Users\[Your Name]\AppData\Local\X Moon Productions\XStoryPlayer 3\XStoryPlayer64.exe" -settings "settings2.ini"</code><br> | + | Set the shortcut target to: <code>"C:\Users\[Your Name]\AppData\Local\X Moon Productions\XStoryPlayer 3\x64\XStoryPlayer64.exe" -settings "settings2.ini"</code><br> |
Now create a copy of the <code>[[settings.ini]]</code> named <code>settings2.ini</code>. Edit the [[settings.ini]] back to: | Now create a copy of the <code>[[settings.ini]]</code> named <code>settings2.ini</code>. Edit the [[settings.ini]] back to: | ||
<syntaxhighlight lang="cpp"> | <syntaxhighlight lang="cpp"> | ||
Latest revision as of 10:01, 4 January 2016
In this tutorial you will learn how to create/change cloth. You will also learn how to use XStoryPlayer for creating cloth states.
Steps
- Copy the
/sources/scenesfiles for this tutorial from the 'Tutorial resource pack' to the/pack/pack_adbucted/sourcesdirectory.
The files contains the textures and maya cloth meshes for the Saiko (Alien) character.
Open thebody.mafile in Maya. Also open thebody.inifile in a text editor.
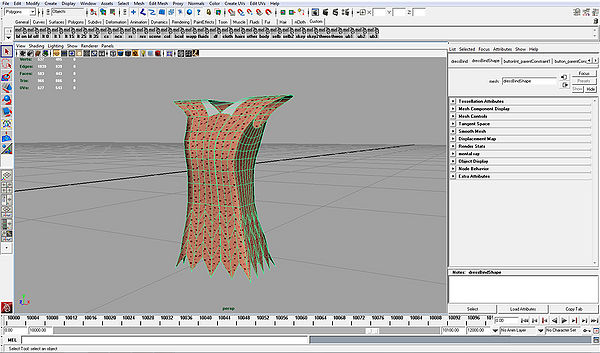
- A cloth needs two meshes to work. A bind-mesh that contains the actual pattern of the cloth. If we change this mesh the shape of the cloth is changed.
Then there is also a render-mesh that is used for rendering the cloth. It has a higher sub-division level for more detail.
(Creating a render-mesh can be done by usingEdit Mesh->Add Divisionscommand on a bind-mesh (Exponentially, Div. level = 1))
The dress for example has bind-mesh "dressBindShape" and render-mesh "dressShape".
The render-mesh needs to be positioned around the character so it does not intersect. - In this tutorial we want to change the shape of the dress a bit. We can use the bind-mesh for that.
Change the "dressBindShape" so it looks somewhat like this:
Save thebody.mafile. Add this maya convert script to thestart.iniused by the filemaker:
Maya scene
{
  src_path = "[SOURCES]";
  run_path = "[RUNTIME]";

  in_file  = "[SOURCES]scenes/character6_cloth/body.ma";
}
Run the filemaker and the new cloth objects should be created in the
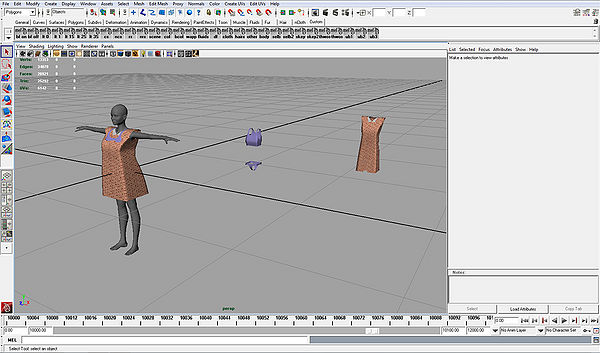
./pack/pack_adbucted/scenes/character6directory. - We can use XStoryPlayer to view and re-position the newly created dress.
Edit thesettings.inilike this:
runtime
{
  start_mode   = TEST; // Start test mode of XStoryPlayer

  debug_sys    = BASIC;
  debug_render = NONE;
  debug_phys   = NONE;
  debug_brain  = ENABLED;

  pack2        = "pack/pack_abducted"; // Use this directory as source as well

  save_key     = "";
}
Now edit the
./testini/run.inito this:settings { mode = CLOTH; // Start cloth position mode name = "alien"; // Name of character name_obj = "scenes/character6"; // File location of character waypoint = "wpIdentity"; // Location in scene where to place character offset_y = 0.0; // Offset in scene move_y = 0.0; // Move amount during cloth fitting //cloth_movie = "stand_0"; // Cloth state used to init cloth pose_type = STAND; // Pose we like to end with //cloth0 = "bra"; // Cloth object 0 //cloth1 = "panty"; // Cloth object 1 cloth2 = "dress"; // Cloth object 2 scene_file = "scenes/test/scene.scn"; // The scene we use for testing scene_waypoint = "waypoint"; // The waypoint we want to start at }
Now run XStoryPlayer again. You should see the character taking on the stand pose. After a while the cloth is fitted like this:
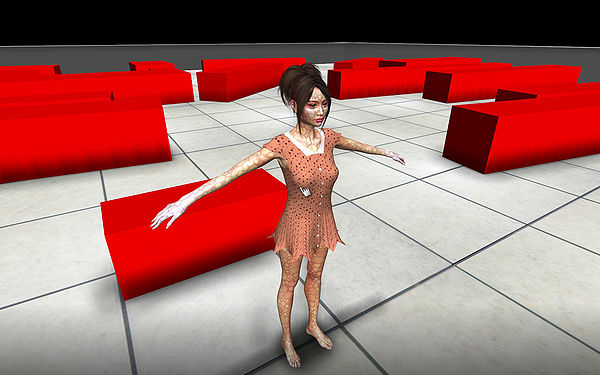
Walk around (or fly using F6) the character and pull the cloth until it nicely fits around the character.
Press [CTRL+Q] to save the cloth state. A file is created here:./state/dress.dat, it contains the dress state.
- Copy the
./state/dress.datfile to the/pack/pack_abducted/state/alien/dressstand_0.datfile (overwrite it).
Now we want to test the new dress in our story. Because we want to start XStoryPlayer in story mode, we have to change the 'settings.ini' again.
In order to not have to do this every time, create a shortcut in the XStoryPlayer directory forXStoryPlayer64.exe. Name this shortcutXStoryTest
Set the shortcut target to:"C:\Users\[Your Name]\AppData\Local\X Moon Productions\XStoryPlayer 3\x64\XStoryPlayer64.exe" -settings "settings2.ini"
Now create a copy of thesettings.ininamedsettings2.ini. Edit the settings.ini back to:runtime { start_mode = SCENE; debug_sys = BASIC; debug_render = NONE; debug_phys = NONE; debug_brain = ENABLED; save_key = ""; }
Now we can use the shortcut to start XStoryPlayer in test mode, next time we are fitting the cloth again on the character.
- Start XStoryPlayer, it should be in story mode because it still uses the
settings.inifile.
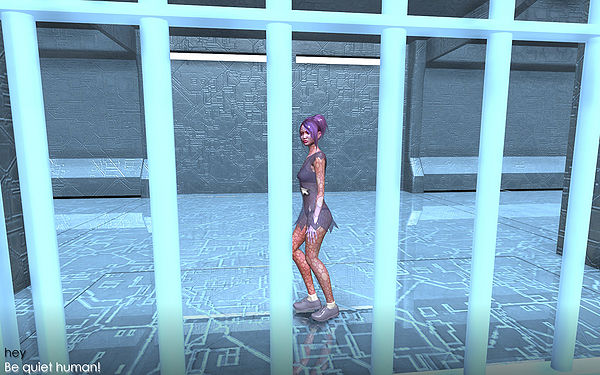
If all went well you should see the alien girl in her newly changed dress. like this:
- Now let us add an object to the scene. Proceed with the next tutorial 'Adding object to scene'.


