Editing scene
In this tutorial we will change the 'Spaceship' scene so that: there are colliders, the door of the cell can open, there are some objects in the cell, there is background sound.
The final result can also be found in the 'Tutorial resource pack', but it would be best to create it using this tutorial yourself.
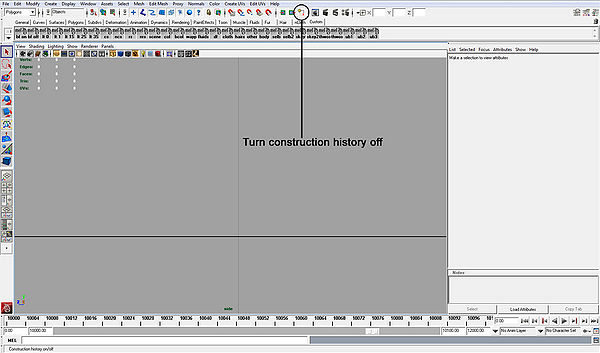
- Open the spaceship scene in Maya. Before we add objects to it, we need to turn the "Construction history" off in Maya.
Do this as follows:
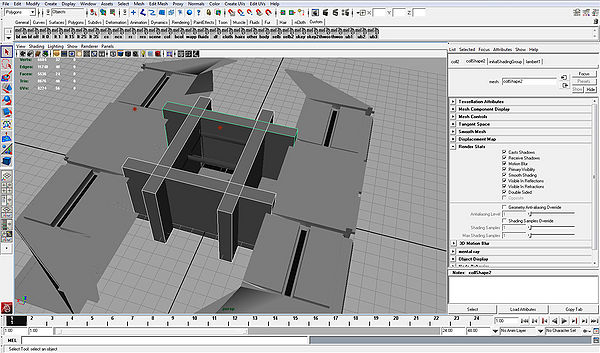
(Click on image for larger image). - Now we can add some objects. Currently only the floor collides. We also want the walls to collide.
Add a few boxes (cubes) around the cell. Use [Create->Polygon Primitives->Cube] in Maya to do this.
Afterwards it should look something like this:
- Now open the
scene.inifile and add:rb "collShape1" { physics { elem[0] {mesh = "collShape1";} elem[1] {mesh = "collShape2";} elem[2] {mesh = "collShape3";} elem[3] {mesh = "collShape4";} } }
This code says that the rigidbody "collShape1" contains 4 physics (collider) objects. The default type for the objects is a BOX.
Maya objects are render objects by default. This means that any object you create in Maya, that is not described in the .ini file, will show up as a rendered object.
Because now the collider Maya objects are referenced they are not rendered to the scene anymore.
Re-run the filemaker to recreate the objects. - Start the abducted story in XStoryPlayer and the walls should collide now.
- Now we want the cell doors to be able to open. Move aside the two larger colliders we created in the previous step and create two extra colliders for the cell doors like this:
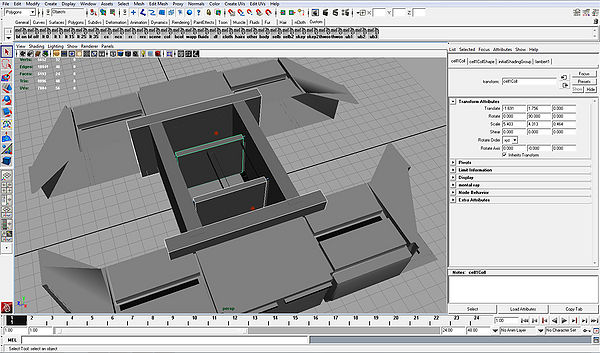
Make sure the cell door colliders do not touch the wall colliders (make them about 10 cm away from wall), otherwise they get stuck. - Now open the
scene.inifile and add:rb "cell1Shape" { link { type = PRISM; // Translating (REVOL is rotate) axis0 = Y; // Axis of translation axis1 = Z; // Opposite axis Fc = 1.0; // Friction kd = 20.0; // damping Ks = 5.0; // Spring that makes door move Ls = 6.0; // Position along Y-axis that spring is attached } render {} // Door is rendered physics { mat_type = NONE; // No collision sounds density = 200; // Not to heavy elem[0] {mesh = "cell1CollShape";} // The collider we just created } } rb "cell2Shape" { link { type = PRISM; axis0 = Y; axis1 = Z; Fc = 1.0; kd = 20.0; Ks = 5.0; Ls = 6.0; } render {} physics { mat_type = NONE; density = 200; elem[0] {mesh = "cell2CollShape";} } }
This code says that the two cell door are now rigidbodies that are translating long y-axis.
Re-run the filemaker to recreate the objects. - Start the abducted story in XStoryPlayer and the cell doors should be slowly opening.
- Last step is to add some ambient sound to the scene.
Get the
alien_abient1.mp3from the previous tutorial and place a copy of it in the./pack/pack_abducted/scenes/sounds/aliendirectory.
Now open the scene.ma and add a small cube calledsound1Shapeon the ceiling of the cell. Save it
Now open thescene.inifile and add: rb "sound1Shape" { media { elem[0] { filename = "scenes/sounds/alien/alien_abient1.mp3"; type = AUDIO; // Audio file (not movie) stream = true; // Stream sound (for .wav set to false) pos3d = true; // We use 3d sound pos3d_min = 5.0; // Sound start decaying after this distance start = true; // Start sound automatically loop = true; // Loop sound volume = 1.0; // The volume } } } This will create a sound at the location of the object.
Re-run the filemaker to recreate the objects. - Start the abducted story in XStoryPlayer and you should hear a spaceship sound. Now we have a scene we can add some scripting in next tutorial 'Create story script'.


