Difference between revisions of "Creating cloth"
From XStoryPlayer Wiki
| Line 1: | Line 1: | ||
In this tutorial you will learn how to create/change cloth. You will also learn how to use [[XStoryPlayer]] for storing cloth states. | In this tutorial you will learn how to create/change cloth. You will also learn how to use [[XStoryPlayer]] for storing cloth states. | ||
| − | |||
| − | |||
==Steps== | ==Steps== | ||
| Line 47: | Line 45: | ||
} | } | ||
</syntaxhighlight> | </syntaxhighlight> | ||
| − | + | Now edit the <code>./testini/run.ini</code> to this: | |
<syntaxhighlight lang="cpp"> | <syntaxhighlight lang="cpp"> | ||
settings | settings | ||
| Line 74: | Line 72: | ||
} | } | ||
</syntaxhighlight> | </syntaxhighlight> | ||
| + | Now run [[XStoryPlayer]] again. You should see the character taking on the stand pose. After a while the cloth is fitted like this:<br> | ||
| + | [[file:cloth4.jpg|400px]]<br> | ||
</li> | </li> | ||
</ol> | </ol> | ||
Revision as of 14:43, 14 January 2015
In this tutorial you will learn how to create/change cloth. You will also learn how to use XStoryPlayer for storing cloth states.
Steps
- Copy the
/sources/scenesfor this tutorial from the 'Tutorial resource pack' to the/pack/pack_adbucted/sourcesdirectory.
The files contains the textures and maya cloth meshes for the Saiko (Alien) character.
Open thebody.mafile in Maya. Also open thebody.inifile in a text editor.
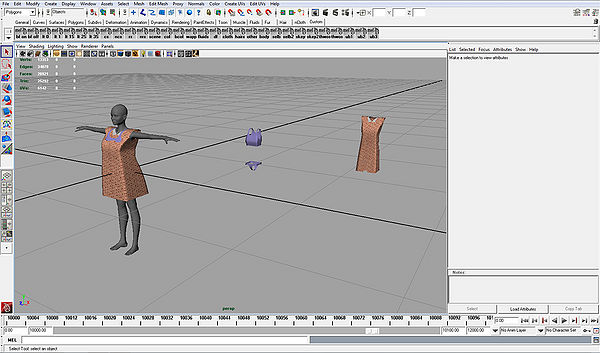
- A cloth needs two meshes to work. A bind-mesh that contains the actual pattern of the cloth. If we change this mesh the shape of the cloth is changed.
Then there is also a render-mesh that is used for rendering the cloth. It has a higher sub-division level for more detail.
The dress for example has bind-mesh "dressBindShape" and render-mesh "dressShape".
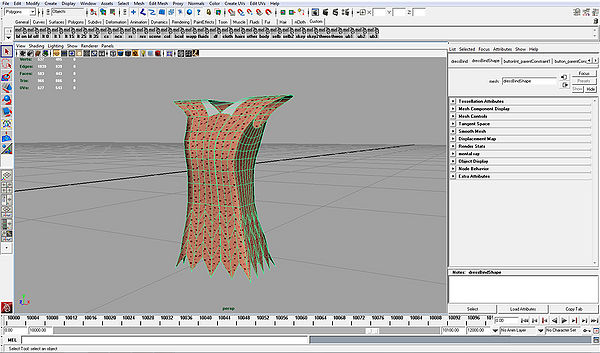
The render-mesh needs to be positioned around the character so it does not intersect. - In this tutorial we want to change the shape of the dress a bit. We can use the bind-mesh for that.
Change the "dressBindShape" so it looks somewhat like this:
Save thebody.mafile. Add the maya convert code to thestart.iniof the filemaker:
Maya scene
{
  src_path = "[SOURCES]";
  run_path = "[RUNTIME]";

  in_file  = "[SOURCES]scenes/character6_cloth/body.ma";
}
Run the filemaker and the new cloth objects should be created in the
/scenes/character6directory. - We can use XStoryPlayer to view and re-position the newly created dress.
Edit thesettings.inilike this:
runtime
{
  start_mode   = TEST; // Start test mode of XStoryPlayer

  debug_sys    = BASIC;
  debug_render = NONE;
  debug_phys   = NONE;
  debug_brain  = ENABLED;

  pack2        = "pack/pack_abducted"; // Use this directory as source as well

  save_key     = "";
}
Now edit the
./testini/run.inito this:settings { reset = true; mode = CLOTH; // Start cloth position mode name = "alien"; // Name of character name_obj = "scenes/character6"; // File location of character waypoint = "wpIdentity"; // Location in scene where to place character offset_y = 0.0; // Offset in scene move_y = 0.0; // Move amount during cloth fitting //cloth_movie = "stand_0"; // Cloth state used to init cloth pose_type = STAND; // Pose we like to end with //cloth0 = "bra"; // Cloth object 0 //cloth1 = "panty"; // Cloth object 1 cloth2 = "dress"; // Cloth object 2 scene_file = "scenes/test/scene.scn"; // The scene we use for testing scene_waypoint = "waypoint"; // The waypoint we want to start at }
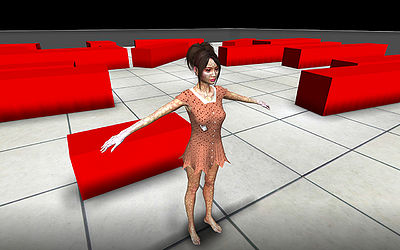
Now run XStoryPlayer again. You should see the character taking on the stand pose. After a while the cloth is fitted like this: