Difference between revisions of "Deriving new character from template character"
From XStoryPlayer Wiki
| Line 30: | Line 30: | ||
Your end result should look like the <code>Step 3 Char_new/body.ma</code> file.<br> | Your end result should look like the <code>Step 3 Char_new/body.ma</code> file.<br> | ||
[[file:new_char_step2.jpg|400px]]</li> | [[file:new_char_step2.jpg|400px]]</li> | ||
| − | <li>Now | + | <li>Now we can rotate/move the joints so the new model has correct joints.<br> |
| − | Make sure you do not translate the joints | + | Make sure you do not translate the joints when they can be rotated. Rotate the joints instead. Or use the joint orient to rotate them (if the rotation is locked).<br> |
| + | Only translate them to make the joints longer.<br> | ||
Use 'X-Ray Joints' to view them better through the body. Use different views (top,front,side) to get a good view of the joint positions.<br> | Use 'X-Ray Joints' to view them better through the body. Use different views (top,front,side) to get a good view of the joint positions.<br> | ||
Use the original model joint hierarchy for reference on where to position the joints.<br> | Use the original model joint hierarchy for reference on where to position the joints.<br> | ||
Do not rotate or move the root_joint! Move the body instead.<br> | Do not rotate or move the root_joint! Move the body instead.<br> | ||
| − | Adjust the joints and make the end result look like the <code>Step | + | Adjust the joints and make the end result look like the <code>char_new Step 4/body.ma</code> file.<br> |
[[file:new_char_step3.jpg|400px]]</li> | [[file:new_char_step3.jpg|400px]]</li> | ||
<li>Now bind the model body mesh to the root_joint hierarchy. Rotate the joints to check that the body is binded.<br> | <li>Now bind the model body mesh to the root_joint hierarchy. Rotate the joints to check that the body is binded.<br> | ||
Revision as of 13:39, 14 February 2015
In this tutorial we will be replacing the character template parts with a new character.
After this tutorial you will know how to create a new character for XStoryPlayer
We assume that you have finished the 'Installing template character' tutorial successfully.
- So you have the pack_character pack installed.
- You have the testing shortcut, for testing the character.
- Also your Maya project path is set to the pack_character/sources
Page is under construction!!!!
Tutorial pack will be updated later this weekend!!
- Open the
./pack/pack_character/sources/scenes/char_template/body.mafile in Maya.
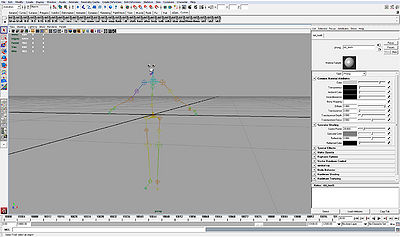
Cleanup the scene. Remove the body, the hair, the body collider until only the character, the skeleton (with bone colliders), the particles, the eyes and the teeth are left.
Also remove the shaders that are not used.
Save the new scene to./pack/pack_character/sources/scenes/char_new/body.ma.
Your end result should look like thechar_new Step 1/body.mafile.
- Now copy the
model/body.mafrom the 'Tutorial resource pack' to thesources/scenesdirectory.
Also copy thetextures/modelfiles from the 'Tutorial resource pack' to thesources/scenes/textures/char_newdirectory.
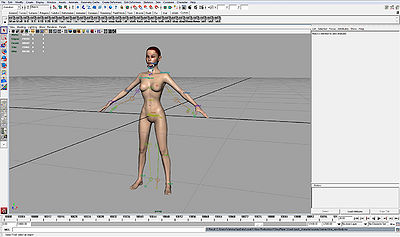
Import themodel/body.mafrom the 'Tutorial resource pack' into your scene. This is the new (rigged) model you will use to replace the template character.
Save the new scene again. (./pack/pack_character/sources/scenes/char_new/body.ma).
Your end result should look like thechar_new Step 2/body.mafile.
- Copy the
char_new Step 2/body.iniinto yourchar_newdirectory.
This is the template ini file, but most elements are commented out so they do not have to created at first in our scene.
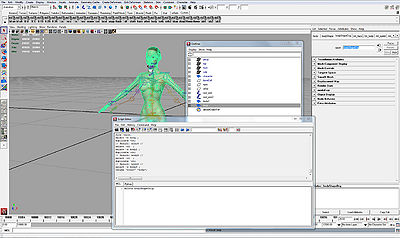
Make a duplicate of the model body (that is not rigged). Name itbody. Make sure itsbodyShapeOrigis deleted (see image).
Hide the rigged model body and its skeleton.
Your end result should look like theStep 3 Char_new/body.mafile.
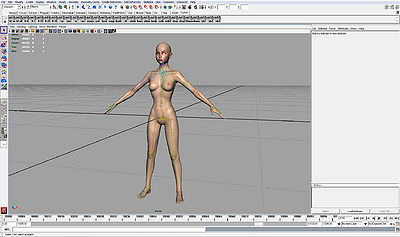
- Now we can rotate/move the joints so the new model has correct joints.
Make sure you do not translate the joints when they can be rotated. Rotate the joints instead. Or use the joint orient to rotate them (if the rotation is locked).
Only translate them to make the joints longer.
Use 'X-Ray Joints' to view them better through the body. Use different views (top,front,side) to get a good view of the joint positions.
Use the original model joint hierarchy for reference on where to position the joints.
Do not rotate or move the root_joint! Move the body instead.
Adjust the joints and make the end result look like thechar_new Step 4/body.mafile.
- Now bind the model body mesh to the root_joint hierarchy. Rotate the joints to check that the body is binded.
Now we have to fix the skinning by mapping the old model rig onto the new one. We can use the Filemaker for that.
Run theStep 4 Char_new/filemaker/start.iniusing the Filemaker, it will map the weights onto the new model.
After running anexport.txtfile is created. Open thebody.mafile in an text editor and replace the weights of the body with the exported weights.
To find where the weights in thebody.mafile are located, search for the skin cluster of the bodyShape e.g.skinCluster8.
A good text editor for editing large files is: TextPad.
Reopen thebody.mafile in Maya. The weights should now be correct. - You can now delete the model body and its joints. Use the Filemaker to create the character


